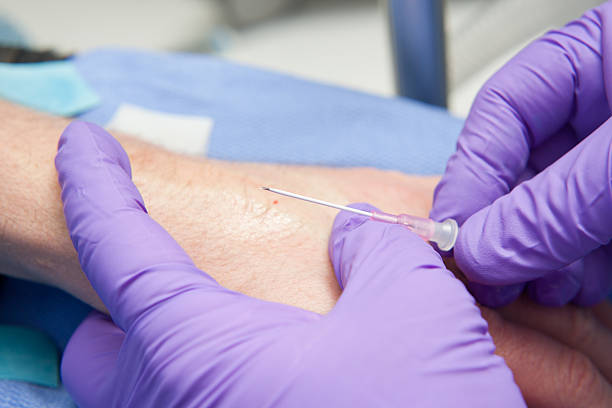
Peripheral IV line and cannula insertion is a medical procedure under IV Therapy or Intravenous therapy. It's purpose is to introduce fluid, medicine, or blood (as in blood transfusion) directly into the veins by providing a passage.
Many patients in the medical and surgical wards will have some form of Intravenous Therapy. This can range from an intravenous infusion with or without an infusion pump, intravenous cannula with an injection port, through to a central venous line. This therapy provides a direct route to the bloodstream which allows for hydration, administration of blood or blood products and administration of medications. Medications that are administered intravenously bypass the normal means of absorption associated with oral, topical, rectal, sub cutaneous or intra muscular administration. Therefore, drugs administered intravenously achieve therapeutic level very rapidly and frequently a lower dose is required.
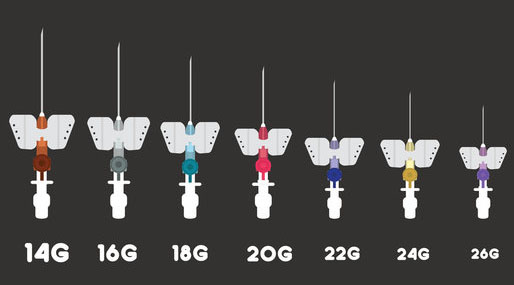
The picture shows various intravenous cannula. These are inserted into the vein, often in the lower arm. The different colors represent different internal diameter (gauges) of the cannula. Fine bore cannula are usually used in children, larger bore for adults. If a large amount of fluid is required to be administered over a short time period a large bore cannula is used.
Aims
1. To gain peripheral venous access in order to:
• administer fluids
• administer blood products, medications and nutritional components
2. To minimize the risk of complications when initiating IV therapy through:
• judicious choice of equipment
• careful choice of IV site
• good insertion technique
• aseptic preparation of infusions
Indications
- IV access is usually needed for anesthesia care, laboring patients, trauma patients, hospital inpatients, and patient care requiring any of the following:
- Emergency administration of medications
- Fluid resuscitation
- Administration of blood products
- Elective administration of intravenous antibiotics, chemotherapeutic agents, or other treatments
- Administration of diagnostic substances, such as methylene blue, indocyanine green, indigo
carmine, or intravenous contrast agents
- Patients donating blood products
Contraindications
Absolute Contraindications
None
Relative Contraindications
- Avoid extremities that have massive edema, burns, or injury; in these cases other IV sites need to be accessed.
- Avoid going through an area of cellulitis; the area of infection should not be punctured with a needle because of the risk of inoculating deeper tissue or the bloodstream with bacteria.
- Avoid extremities with an indwelling fistula; it is preferable to place the IV in another extremity because of changes in vascular flow secondary to the fistula.
- An upper extremity on the same side of a mastectomy should be avoided, particularly if an axillary node dissection was carried out, because of concerns of previous lymphatic system damage and adequate lymphatic flow.
- Very short procedures performed on pediatric patients, like placement of ear tubes
- Bleeding diathesis
- Medication administration that will take longer than 6 days (preference is then for a peripherally inserted central catheter)
- Type of fluid to be administered through peripheral IV is too caustic; hypertonic solutions and some therapeutic agents should not be infused in a peripheral IV.
Key points
1. Only nurses who have been certified as competent in the insertion of IV cannula will
perform this procedure.
2. Where the patient is less than 14 years of age, the IV cannula will be inserted by a medical practitioner. The exception will be in the case of neonates where neonatal trained nurses may insert an IV cannula if directed by a medical officer.
3. In the case of two unsuccessful attempts at insertion, the operator will seek the assistance of another experienced nurse for one additional attempt. After a total three unsuccessful attempts, the assistance of a medical practitioner will be sought.
Selection of Equipment
Cannula selection
1. Select cannula based on purpose and duration of use, and age of patient.
2. Consider risk of infection and extravasation.
3. Cannulae made from polyurethanes are associated with decreased risk of phlebitis.
4. Steel needles have higher risk of extravasation and should be avoided where tissue necrosis is likely if extravasation occurs.
Skin prep
Antiseptic solution – 70% isopropyl alcohol, 0.5 – 1% Chlorhexidine
Use an aqueous based alternative if there is a known allergy to alcohol.
Other required equipment
- Intravenous solution as ordered
- Tourniquet
- Giving set
- IV stand/pole
- Infusion pump
- Transparent occlusive dressing (e.g. IV 2000®)
- Micropore®
- silk tape or similar to secure cannula
- Gloves
- Paper bag
Additional equipment which may be required
- Syringe (5 mL)
- Non bevelled drawing up needle
- Needles (Gauge varies depending on patient age and characteristics)
- Sterile sodium chloride 0.9%
- Local anaesthetic for use by Medical Officer (e.g. 1% lignocaine)
- 3-way tap or triflow
- Short extension tube
For pediatric patients
- Splint and tape (to secure splint)
- EMLA® (Eutetic Mixture of Local Anaesthetic)
- Burette
- Transparent tape for a child less than 12 months of age
1. EMLA cream can usually make the insertion of a central or peripheral intravenous cannula or scalp vein needle painless. The use of EMLA however requires planning as the cream must be applied at least one hour and preferably one and a half hours before the proposed procedure. It is therefore suitable for elective procedures but not for emergencies.
2. EMLA will be effective for up to four hours from the time of application, and penetration may continue for 30 minutes after removal.
3. EMLA is not recommended for infants under 3 months of age. Premature infants should be at least 52 weeks post conception before the use of EMLA cream is considered.
Selection of Catheter Site
Choose a suitable vein. In adults, use long straight veins in an upper extremity away from the joints for catheter insertion – in preference to sites on the lower extremities. If possible avoid veins in the dominant hand and use distal veins first.
Do not insert cannula on the side of mastectomy or AV shunts/Gortex. Transfer catheter inserted in a lower extremity site to an upper extremity site as soon as the latter is available.
In pediatric patients, it is recommended that the cannula be inserted into the scalp, hand, or foot site in preference to a leg, arm, or ante cubital fossa site (Category II).
Procedure
Note: To be able to insert an IV cannula, the practitioner will be required to be at least practicing as an RN or EN, complete with a competency assessment.
The first thing that must be done is to have a signed order for the Intravenous fluid. This is found on the Fluid Treatment Chart.

Make sure to follow the order, unless contraindicated.
The order is signed by the Nurse once it has been given.
Usually it is prepared in a clean room. Prior to priming the line, it is important to check the following with another RN:
- patient name
- IV fluid against the ordered fluid
- expiry date and clarity of fluid
Prior to connecting the primed IV to a patient, the following must be checked against the Fluid Treatment Chart:
- written signed order
- patient ID
- correct fluid
- date and time – often no time is documented – the nurse completes time when IV started
- rate of delivery
Equipment required for connection:
- alcohol swab
- IV change sticker plus gloves and tape
1. Explain procedure to patient/parent
2. Wash hands with antiseptic soap.
Don gloves
Strict adherence to hand washing and aseptic technique remains the cornerstone of prevention of cannula related infections.
3. Apply the tourniquet above insertion site
For pediatric patient, an assistant’s hand used both as a tourniquet and restraint, is often more acceptable to a child than a tourniquet.
4. Disinfect the selected site with skin prep and allow to dry.
Do not touch the skin with the fingers after preparation solution has been applied.
5. If infiltration of local analgesia is required, inject lignocaine 1% at the proposed site of entry of cannula.
Lignocaine may only be injected by a Medical Officer.
6. Inspect the cannula before insertion to ensure that the needle is fully inserted into the plastic cannula and that the cannula tip is not damaged.
Do not touch the shaft or tip of the cannula.
7. Ensure that the bevel of the cannula is facing upwards.
Rationale: Facilitates the piercing of the skin by the bevel.
8. Insert the needle and the cannula into the vein.
Gentle traction on skin may stabilize the vein under the skin.
9. Partially withdraw the needle and advance the cannula.
10. Release the tourniquet
11. Secure the hub of the cannula with clean adhesive tape.
Do not cover the puncture site. Cut tape immediately prior to use only.
12. Flush the cannula with normal saline
Rationale: Ensures the line is patent and accessible.
13. Cover the intravenous and surrounding area with a sterile transparent dressing.
Ensure that the insertion site and the area proximal to the site are visible for inspection purposes.
14. If infusion is ordered, prime the line and connect the intravenous giving set to the cannula.
If the site needs to be immobilized, use a well padded splint and strapping if necessary.
For infants <12 months, a transparent tape must be used.
If a bandage is used, apply it at each end of splint so that the central area is lightly covered for easy inspection.
Conform bandages to secure the splint are available for pediatric patients if required.
15. Dispose of equipment safely.
Note the date and time of insertion in the patient’s medical record.
Record date of line change and secure to IV line.
Intravenous lines used for intermittent infusions must be labeled with the patient’s name, and the date and time of commencement.
IV documentation
No job is finished until the paperwork is done! IV therapy is no different. It is necessary to ensure the following:
- signed the Fluid Treatment Chart, complete the time and date started
- completed and attached a Change of Line label to the IV tubing
- entered the IV fluid type and volume onto the Fluid Balance Chart
- documented the insertion site and date in the patient record/care plan
- attached a date and time of insertion label to the IV dressing
- attached an IV time label to the IV bag!
Nursing Care
- Always wash hands after placing an IV catheter.
- Before injecting medication into an IV or before connecting a new fluid bag to the IV, cleanse the port site with an alcohol swab (70% alcohol) and allow to air-dry.
- Evaluate the IV site at the time of new injections and regularly to ensure that no infiltration has occurred and that IV injection agents are intravascular, not subcutaneous.
- Evaluate the IV site daily for evidence of infection: rubor (redness), calor (warmth), dolor (pain), and tumor (swelling). Palpate the site to ensure that there is no pain near or around the catheter. If the site is covered by tape and there is tenderness at the catheter site, remove the tape to evaluate the catheter site.
- If evidence of infection exists, remove the IV catheter and place another in a different location.
- Encourage patients to report any changes or discomfort at the catheter site.
- Antibiotic prophylaxis (oral or topical) is not indicated for peripheral IV indwelling catheters.
- If an IV does not have a constant infusion flowing through the tubing, anticoagulant flush solutions are used in catheters to prevent thrombi and fibrin deposits. A commonly used solution is 5 mL of saline with 10 U/mL heparin.
- Change the catheter site dressing immediately if the dressing is loose, wet, or visibly soiled.
- Promptly remove any intravascular catheter that is no longer essential.
- Replace peripheral venous catheters at least every 72 to 96 hours in adults to prevent phlebitis. Leave peripheral venous catheters in place in children until IV therapy is completed, unless complications (e.g., phlebitis and infiltration) occur.
- When adherence to aseptic technique cannot be ensured (e.g., when catheters are inserted during a medical emergency), replace all catheters as soon as possible and after no longer than 48 hours.
- Catheter tips do not need to be routinely cultured.
Complications
Common Complications
- Inability to identify a vein for catheter placement.
- Failing to get a “flash” once the catheter is inserted.
- A flash appears, but there is no further blood flow.
- Failing to thread the catheter into a vein after the needle is retracted.
- Infiltration; remove the catheter and apply pressure.
- Kinking of the catheter; usually the catheter must be removed.
Infrequent Complications
- Difficult IV access
- Minor bleeding
- Infection
- Localized site infection
- Cellulitis
- Superficial thrombophlebitis
Serious and/or Rare Complications
- Infiltration of a caustic material, such as a chemotherapeutic agents or Pentothal, which can lead to severe pain, tissue irritation, vasospasm, necrosis, and sloughing of tissues
- Abscess formation
Catheter-related bacteremia
- Bacterial endocarditis